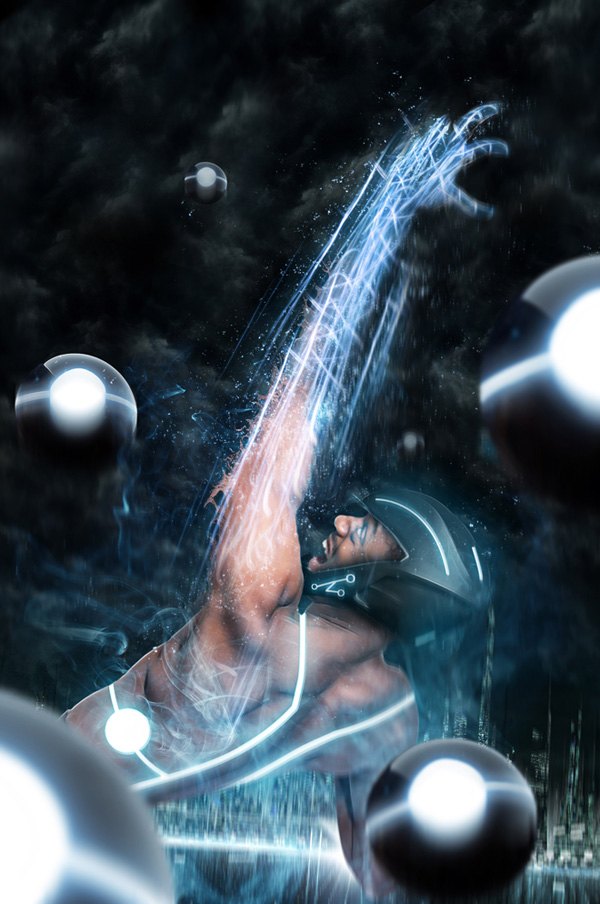
Video and Promotional Trailer
Tutorial Resources
- Stock image: Reacher by Sekani Solomon
- Stock image: Tron Legacy. City concept. by Vladimir Shelest (deviantART)
- Texture: Clouds by Sekani Solomon
- Textures: Dark Abstract Textures by Baonhi (cd4design)
- Stock image: Orb by Sekani Solomon
- Concept art: Tron Quorras Helmet by Neville Page
- Stock image: Stock photo: smoke by Matúš Petrila (stock.xchng)
- Brushes: 41 Grunge Brushes – PS7 by KeepWaiting (deviantART)
Step 1: Set Up the Document
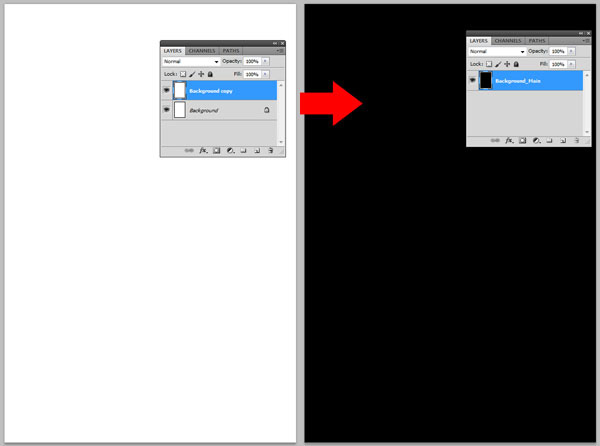
Make a new Photoshop document with a Width of 2325px and a Height of 3500px set with a Resolution of 300pixels/inch.
Duplicate the default white Background layer and then delete it. Using the Paint Bucket Tool (G) to fill the new layer with black (#000000), then rename the layer “Background_Main” for the purpose of keeping our work organized.
Step 2: Place the Subject into the Scene
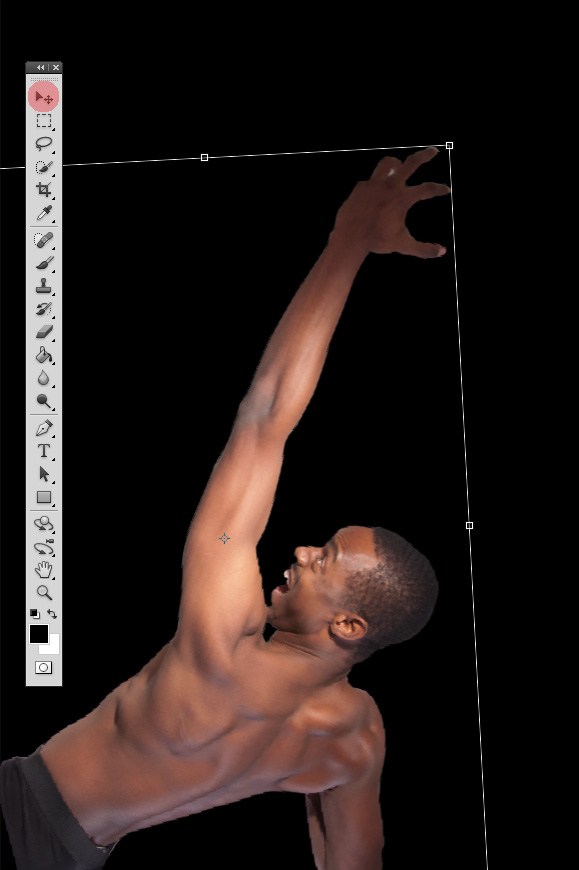
Now we will start constructing the background of the scene and placing some elements onto it. Download and open the Reacher image and place it on top of the black background. Rename the layer to “Reacher”.Rescale and change the orientation of the image using Free Transform.
Download and open the Tron Legacy. City concept. stock image, place it in a layer between “Background_Main” and “Reacher”, then rename its layer to “City”.
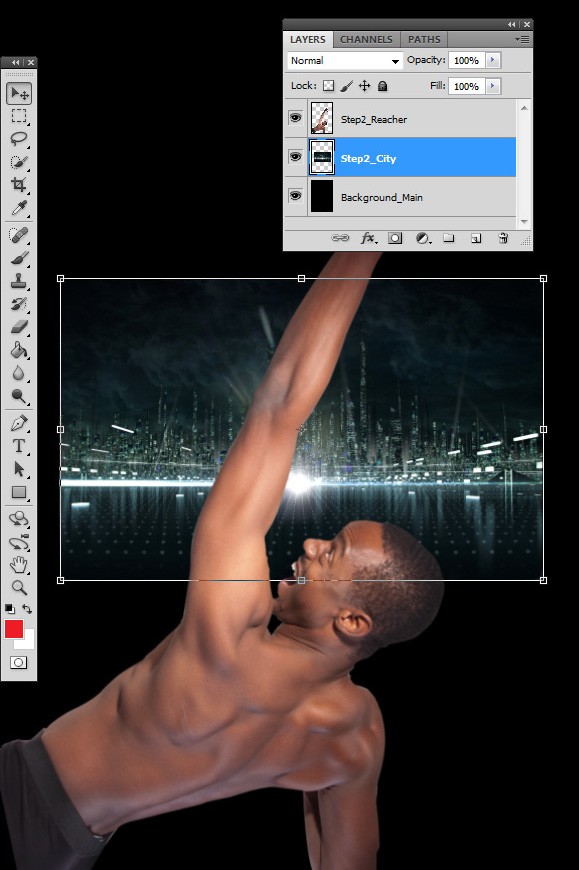
Use Free Transform (Ctrl/Cmd + T) to rescale and change the orientation of the image.
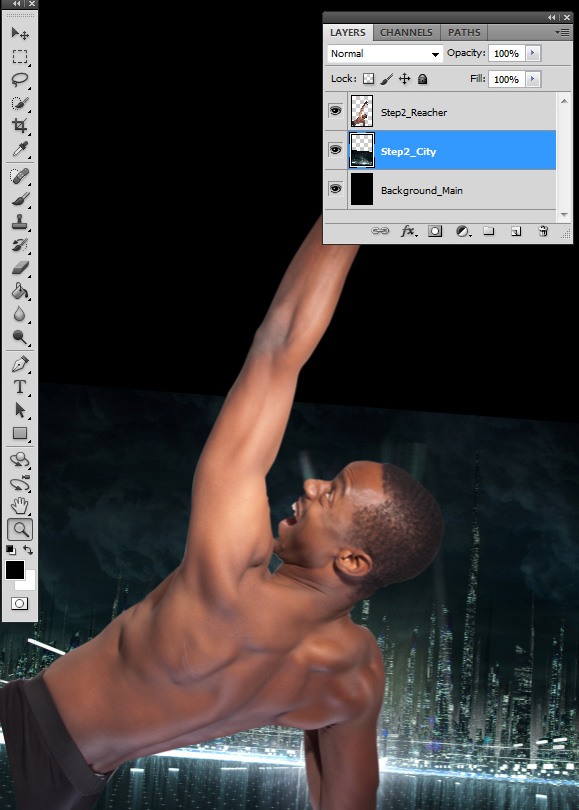
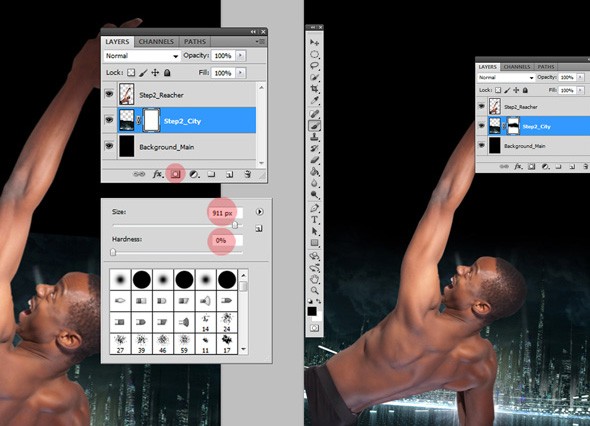
Add a layer mask to the “City” layer. With the layer mask selected, brush on the upper edges of the image using a black brush (Master Diameter: 911px, Hardness: 0%). Do this so there is a clean transition from the sky to the black background.
Step 3: Develop the Sky
Let’s further develop the background by building the sky. Download and open my Clouds image and place it over the “City” layer.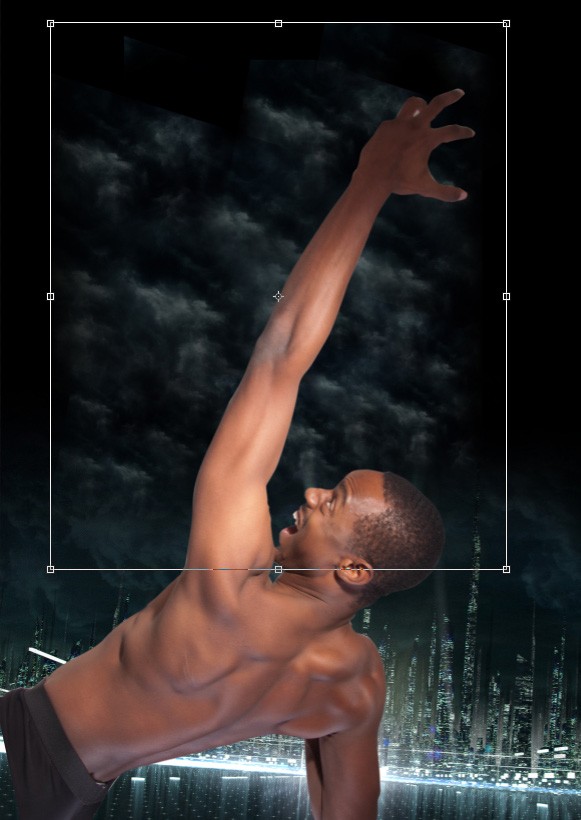
Duplicate the layer several times until it fills the upper part of the background. Be sure to make the clouds on the top larger than the ones on the bottom, which helps with the illusion of depth. Also, change the orientation of the duplicated images so the clouds do not look like a continuous pattern. Make sure that there are no sharp edges where the clouds intersect. This can be done by erasing the edges with the Eraser Tool (E).
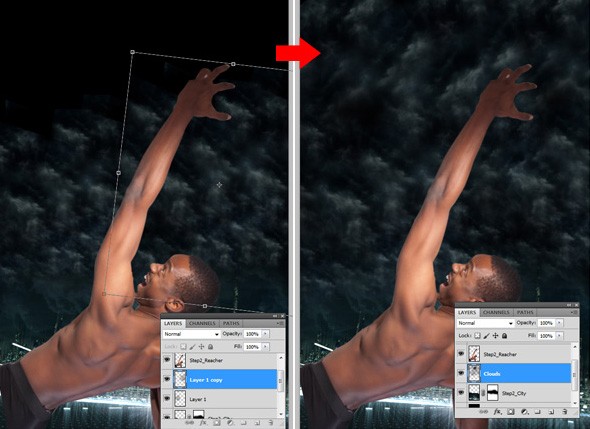
When you’re finished building the sky, select all the cloud layers, then press Ctrl/Cmd + E to merge the layers. Rename this merged layer as “clouds”.
Step 4: Add Light Streaks on the Arm of the Subject
Let us begin creating the light streaks on the arm of the subject. Download the Dark Abstract Textures pack, open one of the images in the pack, place it over the “Reacher” layer, and then rename its layer to “Lights”.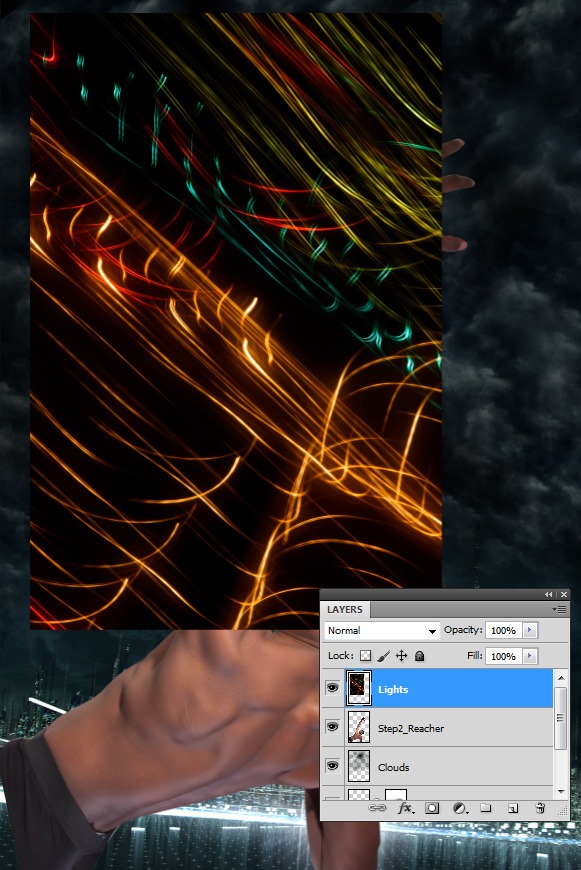
Using the Polygonal Lasso Tool (L), make a selection around the large light streak, copy and paste the selection onto another layer.
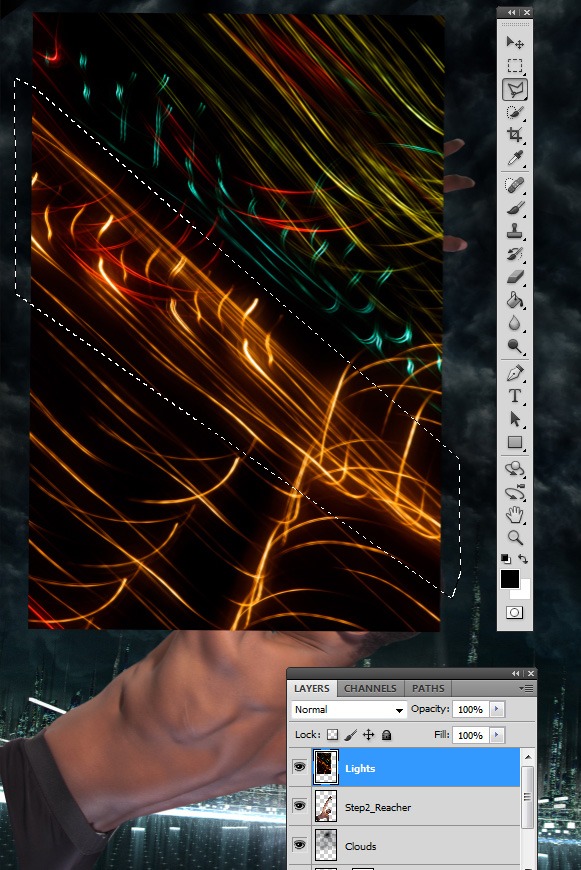
Turn off the visibility of the original “Lights” layer. Change the Blend Mode of the new layer to Screen and change the orientation of the lights so it fits over the arm of the subject.
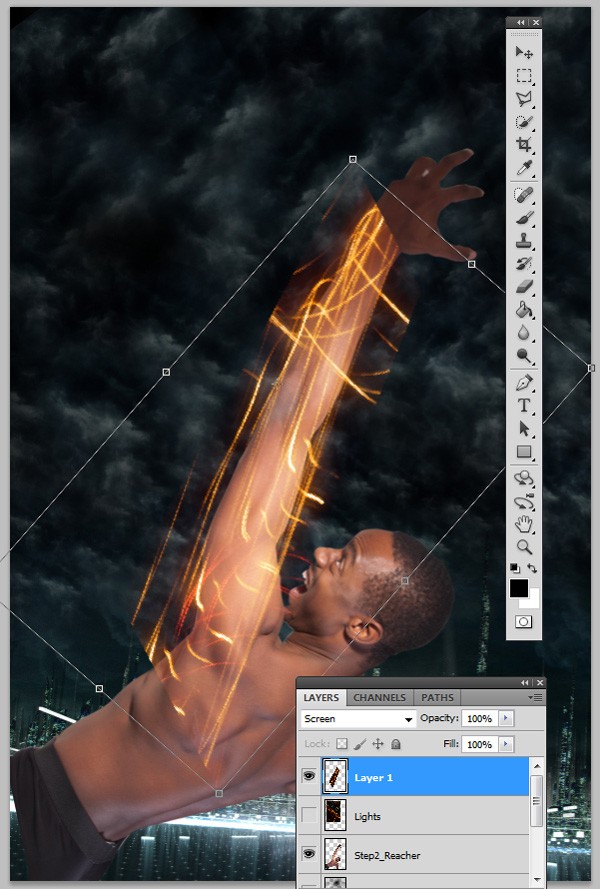
Step 5: Refining the Light Streaks
Let us enhance the blending of the light streaks on the arm. Using the Eraser Tool (E), erase the hard edges of the light streaks.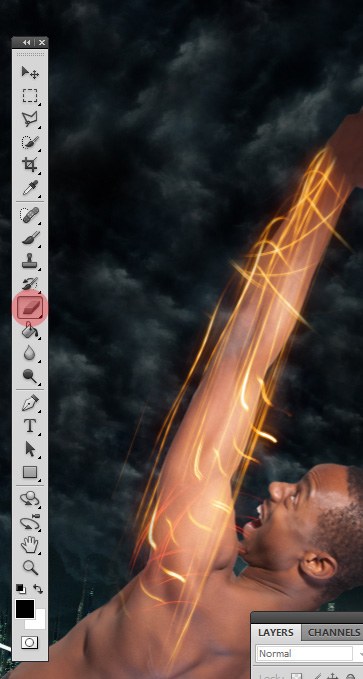
Copy the layer, resize the light streaks in the duplicated layer, and move the copied layer a bit to give the light streaks more detail.
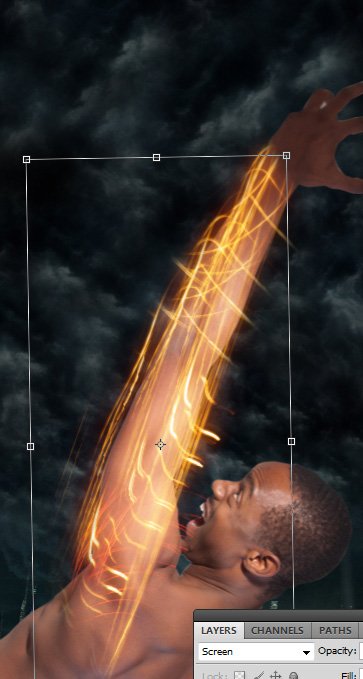
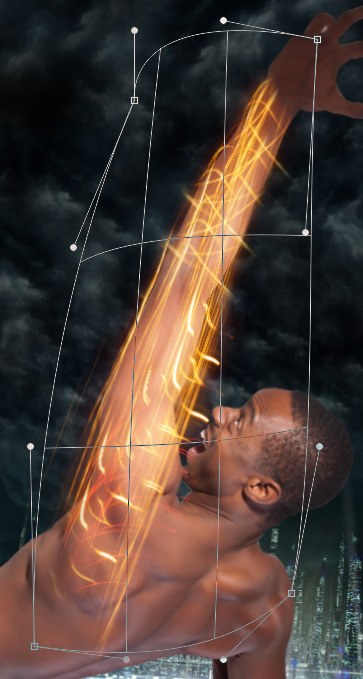
Use Warp Transform (Edit > Transform > Warp) to make the streaks follow the contours of the arm.
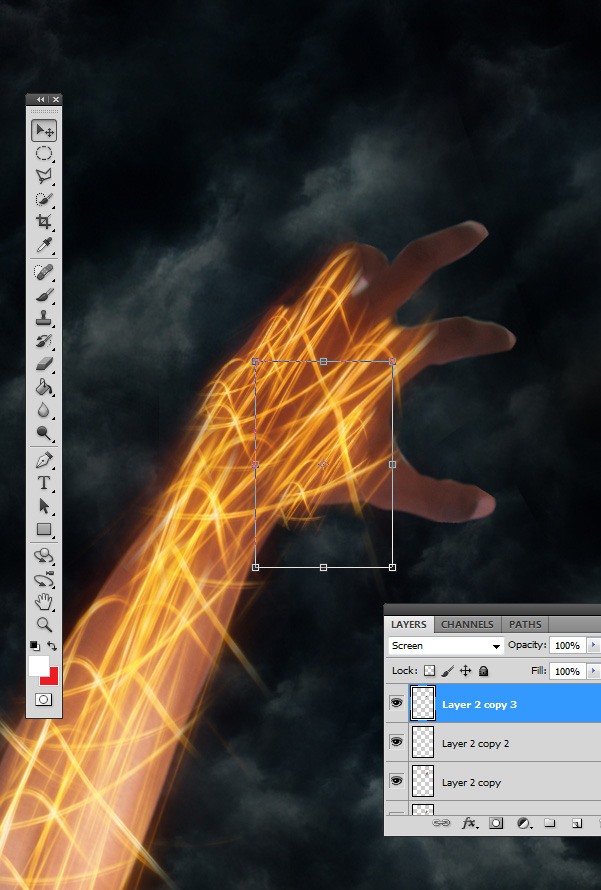
Use the Polygonal Lasso Tool (L) and select a small portion of the light streak. Copy the selected area, and use that to build the lights on the back of the hand. Use Free Transform along with the Eraser Tool to make adjustments as necessary.
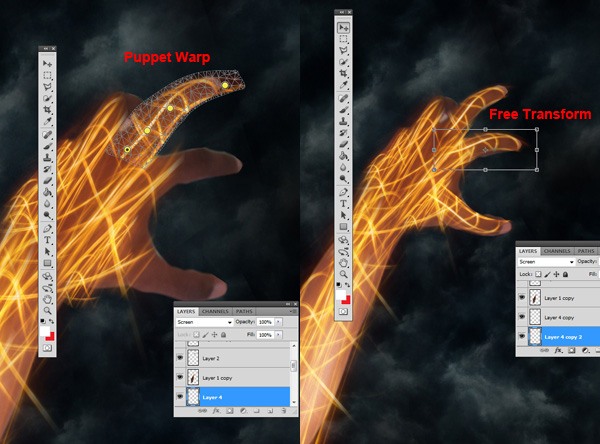
Using the Polygonal Tool, select another small part of the light streak and use this to build the lights on the fingers. Use Puppet Warp (Edit > Puppet Warp, only available in Adobe Photoshop CS5) to bend the lights on the finger joints. Use the other Transform commands as needed to give the lights good contour and shape to match the hand.
Merge all the layers and rename the merged layer as “Arm Light”. Switch the Blend Mode of the “Arm Light” layer to Screen.
Step 6: Modify the Colors of the Light Streaks
Now, we will change the color of the streaks. Duplicate the “Arm Light” layer and desaturate the duplicated layer by pressing Shift + Ctrl/Cmd + U. Make sure the Blend Mode of the duplicated layer is still set to Screen. Use Curves adjustment (Ctrl/Cmd + M) to modify the colors a bit.
Switch to the original “Arm Light” layer, go to Image > Adjustments > Hue/Saturation, and change the Hue to +180.

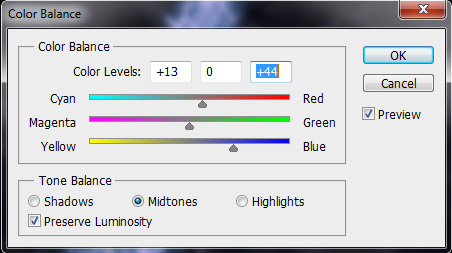
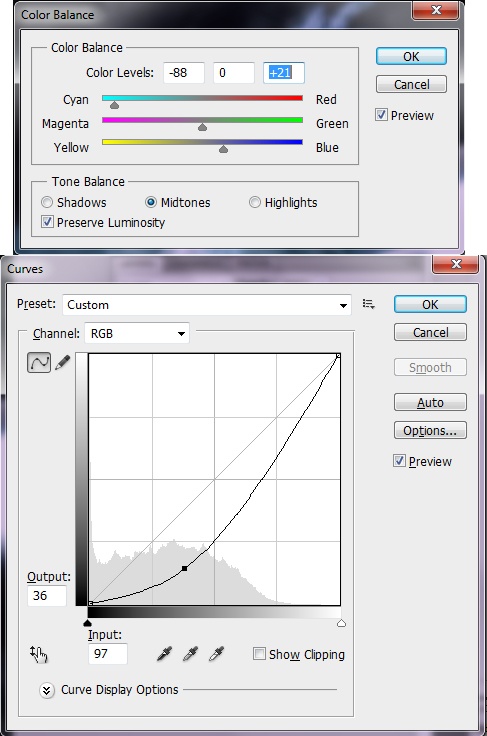
Switch back to the “Arm Light” duplicate layer, press Ctrl/Cmd + B to open the Color Balance image adjustment dialog window, then use the following image as a reference for tweaking the settings.
Step 7: Skin Distortion
Here, we are going to give the skin some distortion and tighten up on the transition from the arm to the light streaks. Duplicate the “Reacher” layer and apply the Displace Filter (Filter > Distort > Displace) to the duplicated layer. Add a layer mask on both the original and duplicate “Reacher” layers.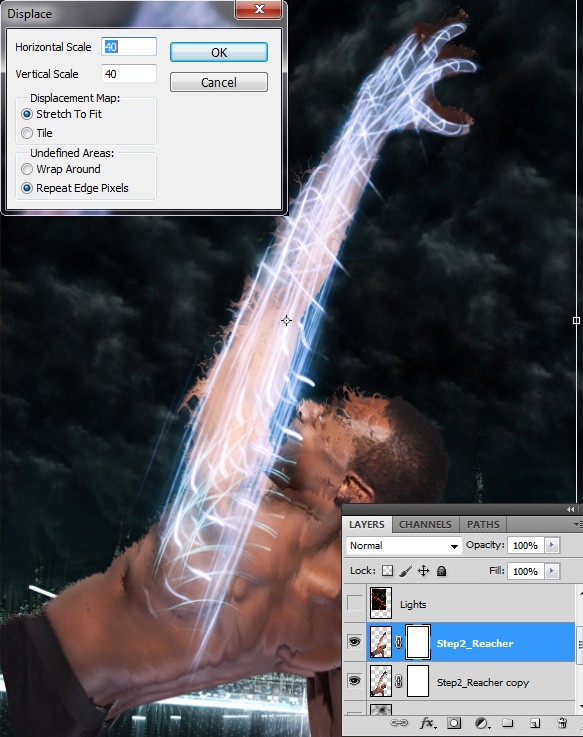
Using the layer masks, mask out the distorted “Reacher” layer, leaving only parts of the lower and upper arms. Also, mask out the entire lower arm of the undistorted “Reacher” layer.

Step 8: Build the Base of TRON Lighting Effects
Now we are going to make the TRON lighting effects. First, create a new layer. With a 100% Hardness, 25px brush, use the Pen Tool (P) to trace outlines of the lights that follow the contours of the subject’s body. After the outline is created, right-click and choose Stroke Path, making sure not to apply the Pressure option.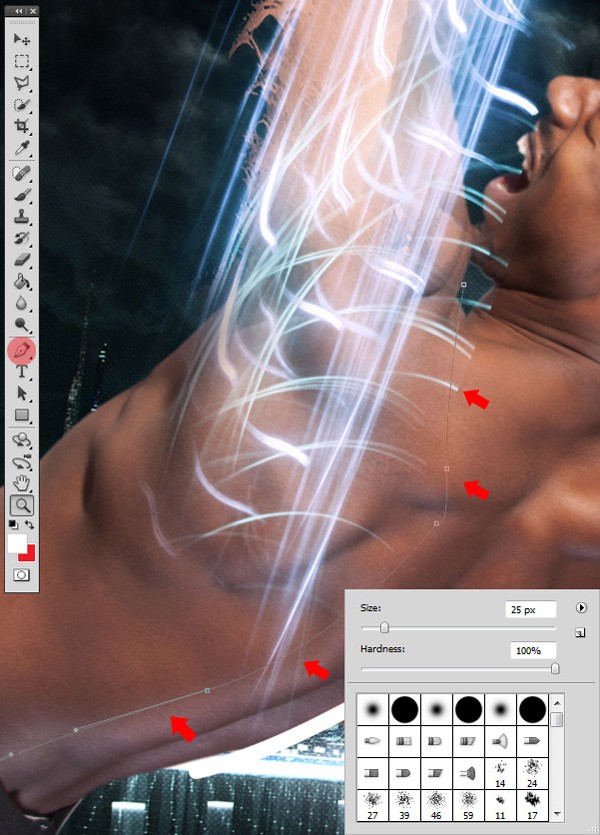
Use the Elliptical Marquee Tool (M) to make a circle which intersects the line coming across the lower part of the torso.
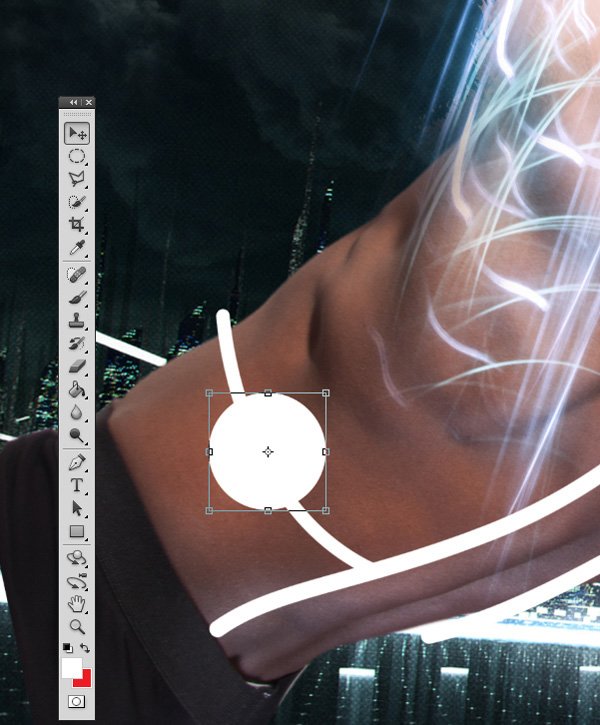
This is where it gets tricky; we are going to attempt to give the illusion of the lights being inside the skin. Ctrl/Cmd + click the layer with the light streak outlines to load a selection around them, and then turn the visibility of that layer off.
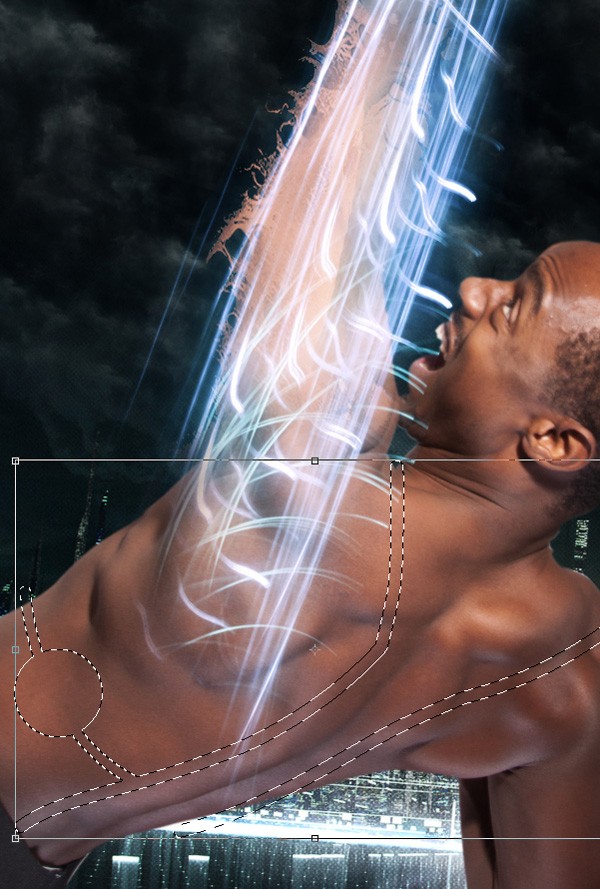
Select the undistorted “Reacher” layer and, using the light streak outlines, mask out the outlines. Duplicate the layer and add a Bevel and Emboss layer effect to the bottom layer (settings shown below).
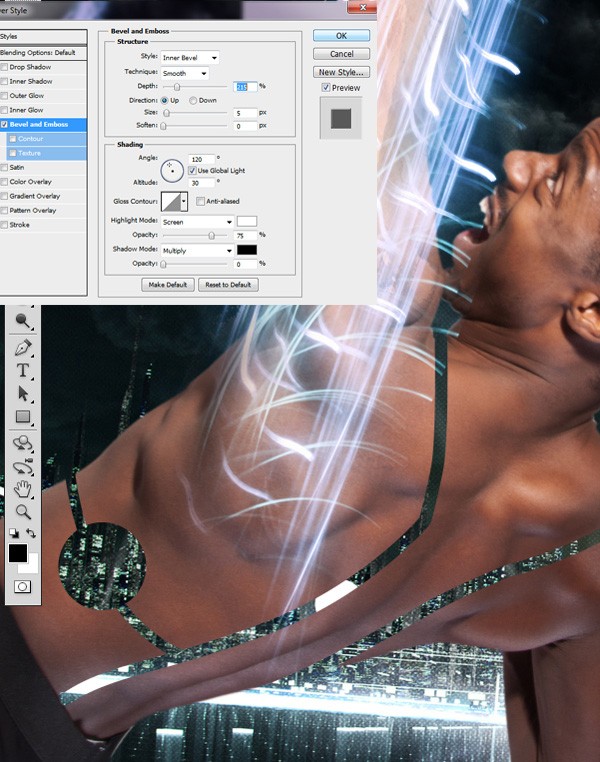

Now we have two problems: (1) the duplicated layer on top is hiding some of the bevel of the light streak outline and (2) some of the bevel on the bottom layer is showing in unwanted areas. To solve these problems, on the bottom layer, mask out the parts of the bevel that are unwanted (the outer edges). Then select the layer on top and then mask out the parts of the skin that are covering the bevel on the TRON light streaks.
Step 9: Trim the Base of the TRON Lighting Effects
We are going make the streaks flush with the body, so we will trim off some excess. Turn on the visibility of the light streaks outline layer again, and drag it below the beveled “Reacher” layer. Ctrl/Cmd + click the “Reacher” layer that is not beveled to load a selection, invert the selection (Select > Inverse), select the light streaks outline layer and then hit Delete to remove the selected area. What we just did was we made a selection of the negative space around the subject, which enabled us to delete the excess light streaks.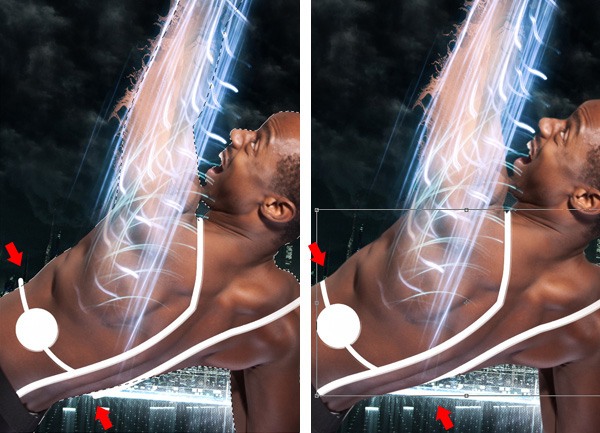
Step 10: Add Color to the TRON Lighting Effects Base
Add the following layer style (Inner Glow) to the light streaks layer (color: #8accef).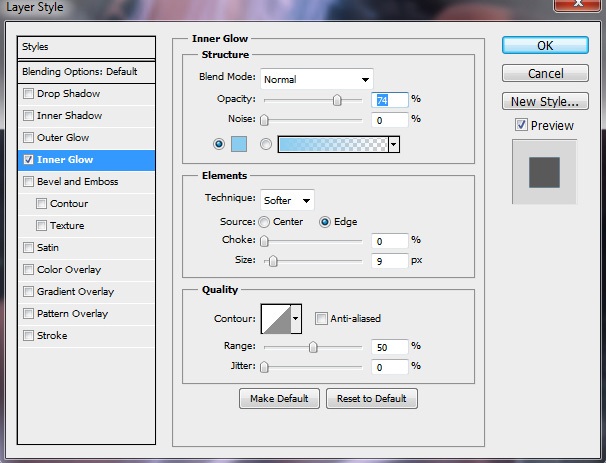
Copy the light streaks outline layer and place it over all the “Reacher” layers. Double-click on the layer to open up the Layer Style dialog window. Under Blending Options, change the Opacity to 0%. What this does is it reduces the opacity of any object on the layer, but not the opacity of the layer style. In this case, it enables us to put an outer glow on an invisible object.
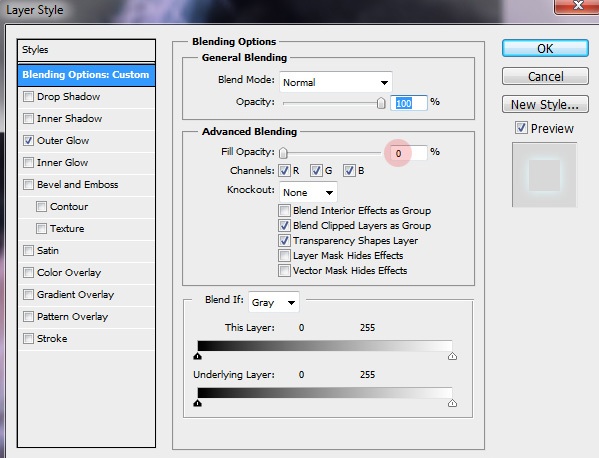
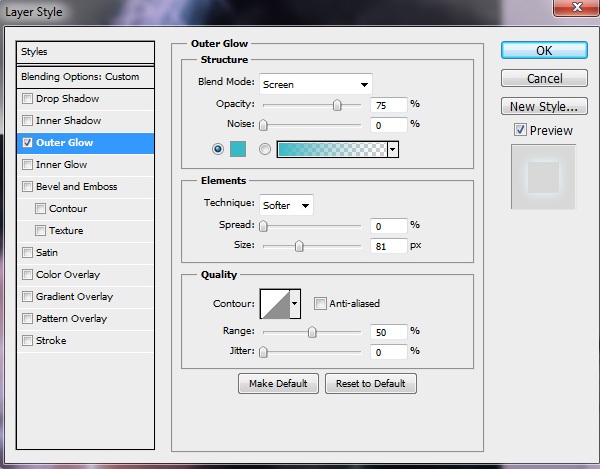
Afterwards, add this Outer Glow layer style. (color: #36bac6).
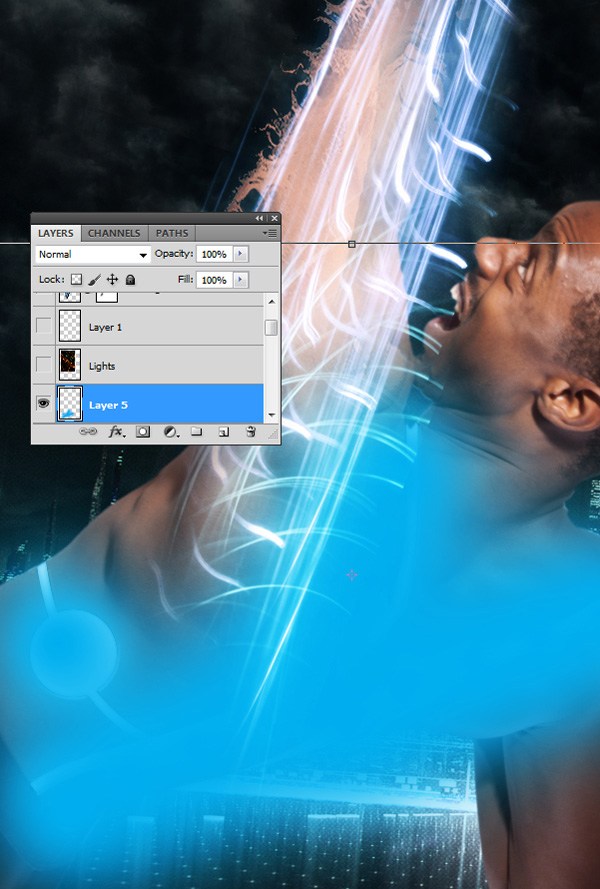
Make a new layer. With a brush at 0% Hardness and a TRON blue color (#02acec), brush over the TRON streaks we previously made.
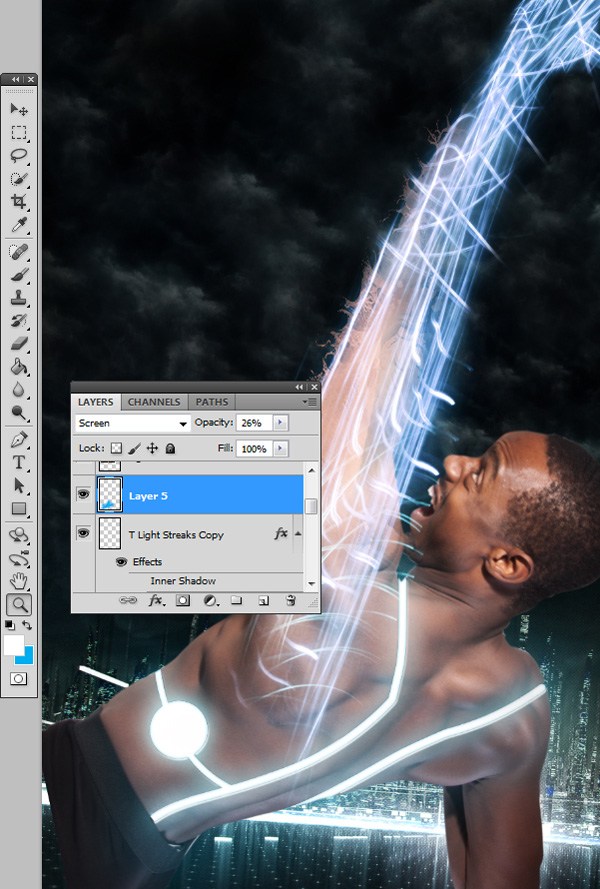
Change the Blend Mode to Screen and reduce the Opacity of the layer to 26%.
Step 11: Adding Orbs
Next, we will add another element into our scene: Orbs. Download and open my Orb image, place it on top of all the layers in our scene, and rename its layer to “Orb”.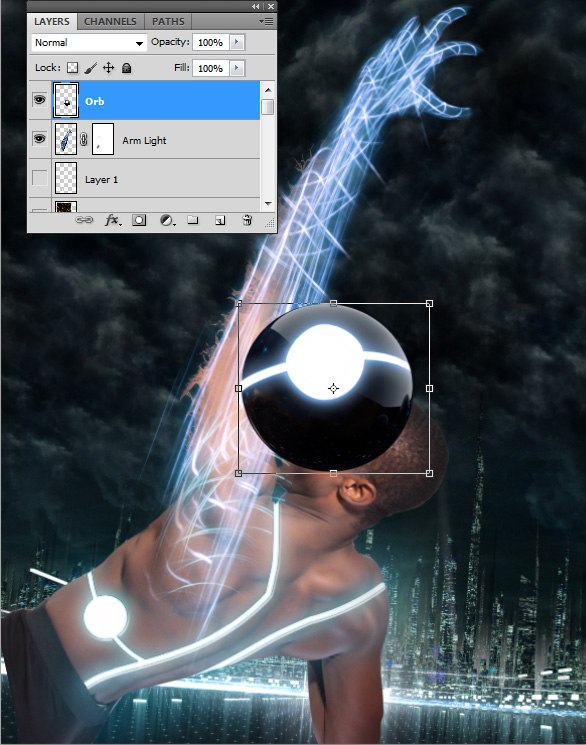
Copy the orb several times. We will attempt to give the image a sense of depth by using diminishing sizes for each “Orb” layer. Place an orb to the bottom left corner and make it your largest size.
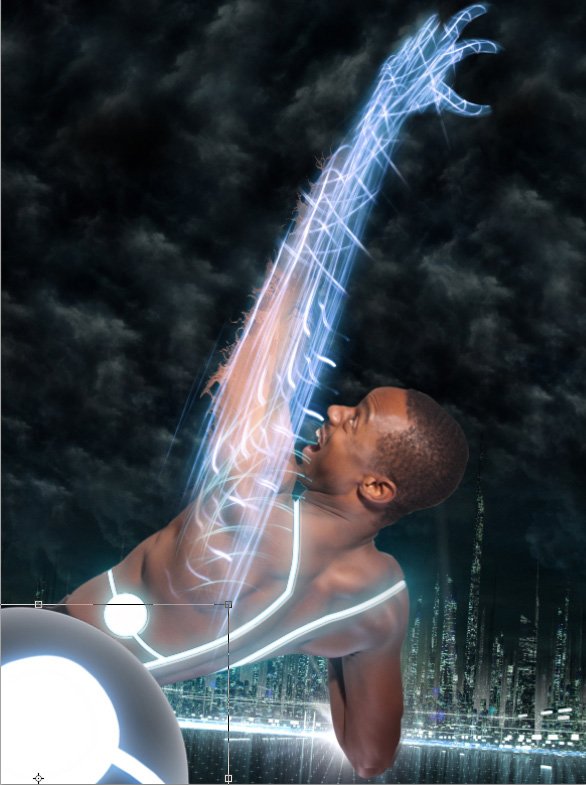
Place the other orbs in various places, making sure to alter their sizes and layer opacities depending on their position, to create a sense of depth. Also, arrange them in a way that gives the image a good balance. You will have to change the layer orders to give the appearance that the orbs are behind the subject. Merge as much of the orb layers as possible.
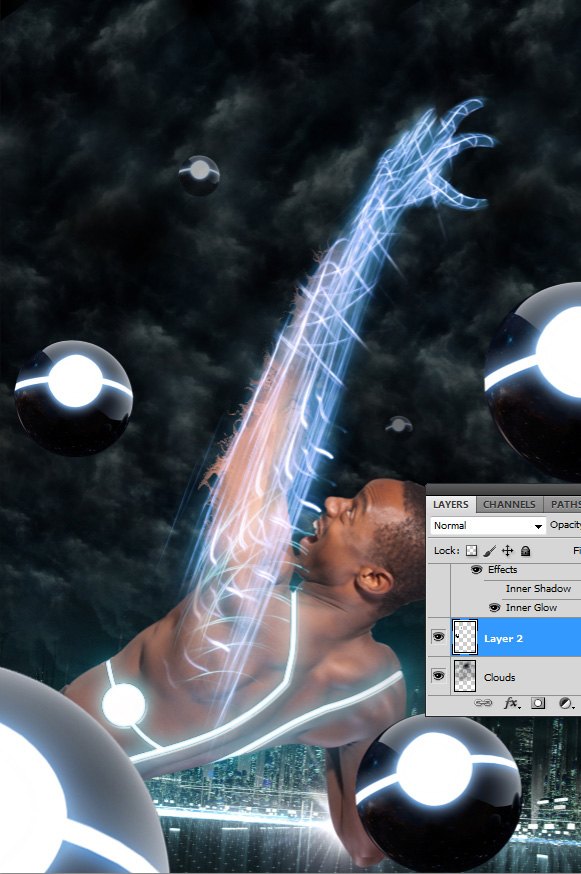
Step 12: Depth of Field
We will now give the image some depth of field. Use the Rectangular Marquee Tool (M) to make a selection of the orb on the bottom left. Then use the Gaussian Blur filter (Filter > Blur > Gaussian Blur) at about 17px Radius. Do the same for some of the other orbs, alternating the blur radius of the filter.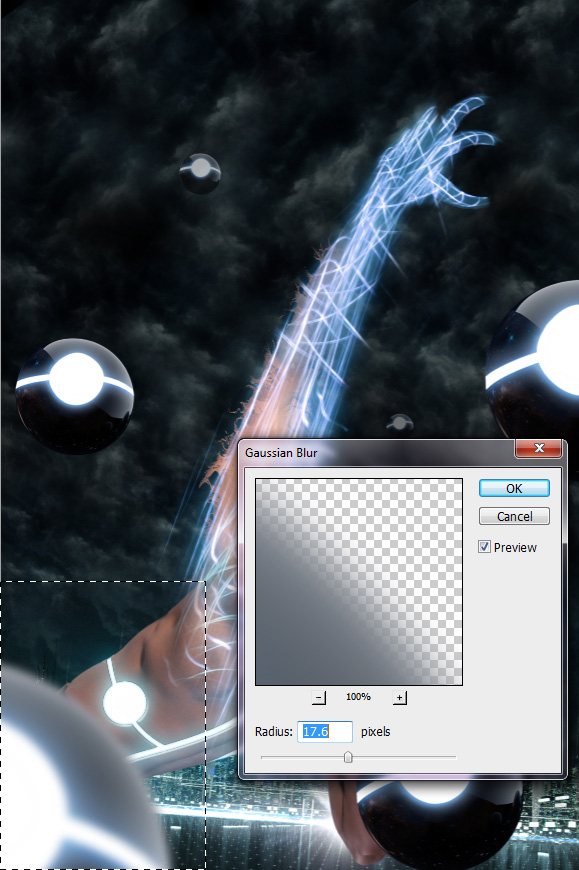
Step 13: Create a Sense of Motion
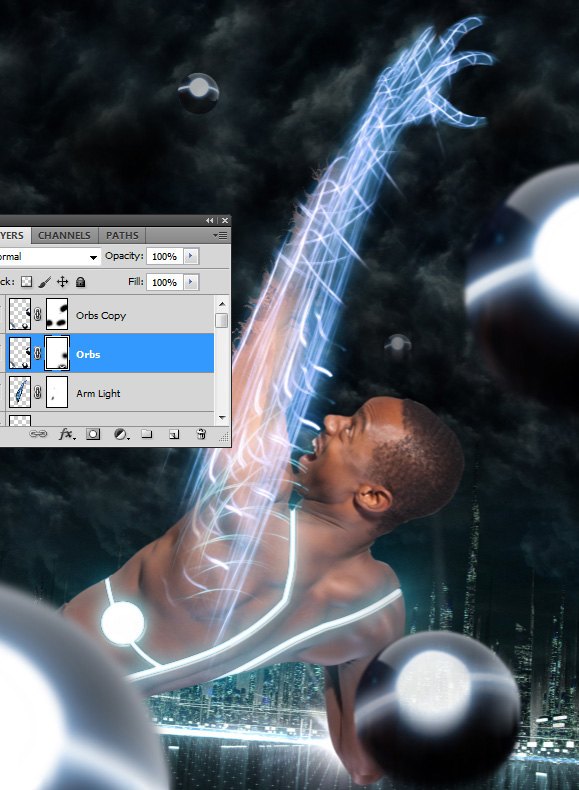
Let us give the orbs a feeling of motion to make our scene a bit more dynamic in nature. Make a copy of all the orb layers and add layer masks to both the copied and original orb layers. Apply the Motion Blur filter (Filter > Blur > Motion Blur) to the copied layers with the Angle at 90o and Distance of 112px.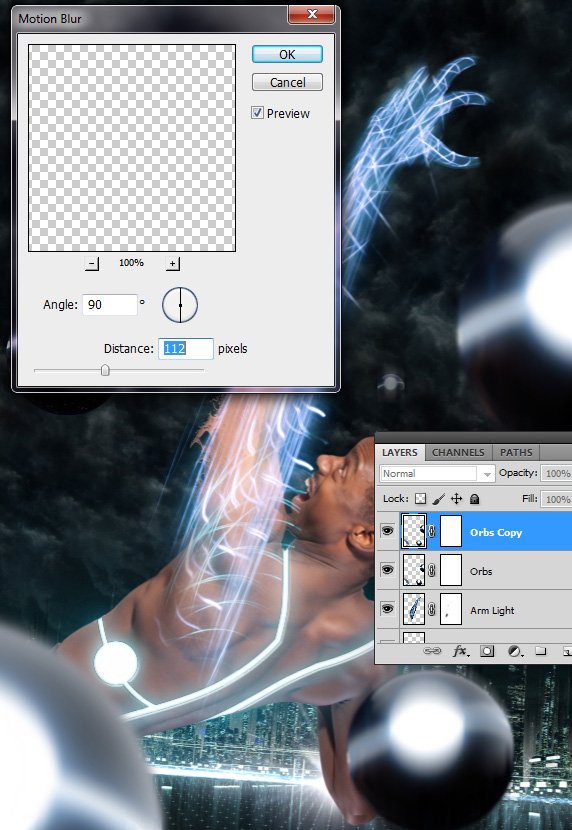
Using the layer masks, mask out the top of the motion-blurred orb layers and the bottom of the other Orbs layers. You should do this for all orb layers.
Step 14: Add the TRON Helmet
Next, we are going to make the helmet for our photo subject. Download and open Tron Quorras Helmet, isolate one of the helmets, and place it into our scene. Lower the opacity of the helmet’s layer so you can see the subject’s head below it.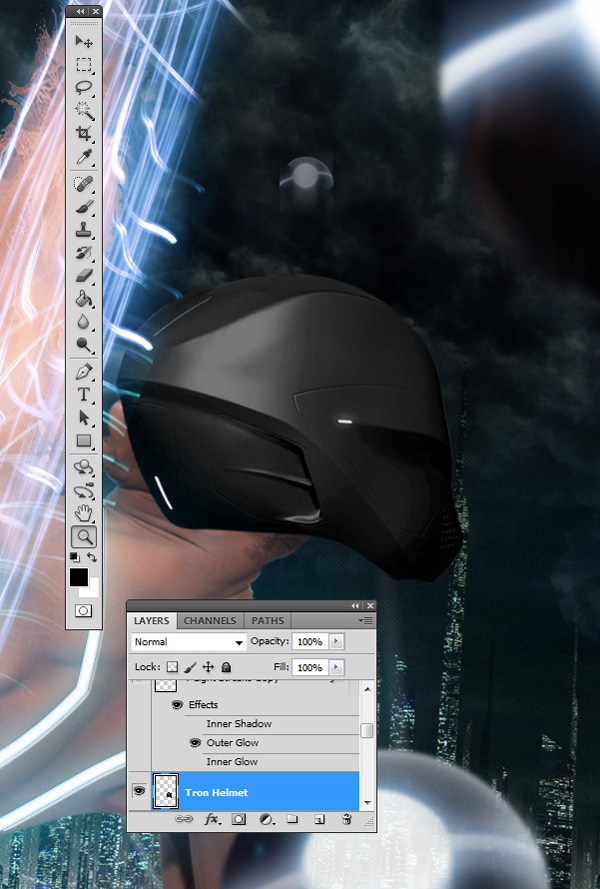
Using Free Transform (Ctrl/Cmd + T), rotate and scale the helmet to match the subject’s head, making sure that the outline on the front of the mask are over the eyes and below the mouth.
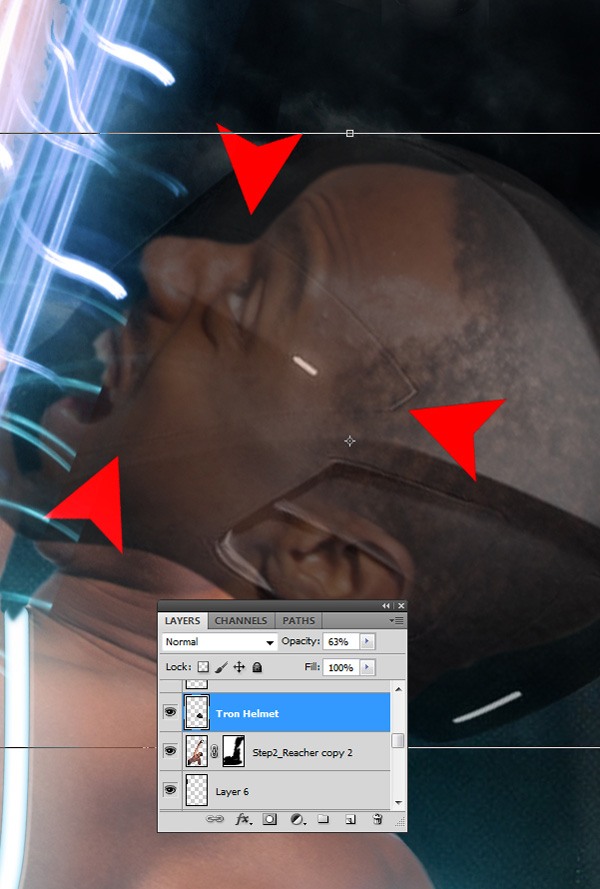
Use the Pen Tool (P) to cut the face of the helmet, and cut the lower ends of the helmet that is covering the shoulder.
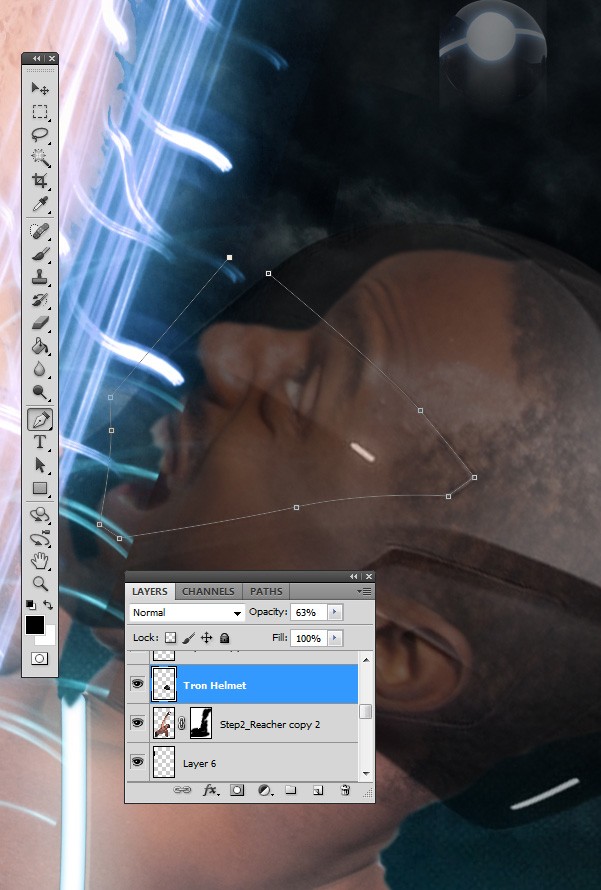
Add a Bevel and Emboss layer style to the helmet using the same technique used in Step 8 (make two layers, add a bevel to the bottom one and using a layer mask to erase sections of both layers).
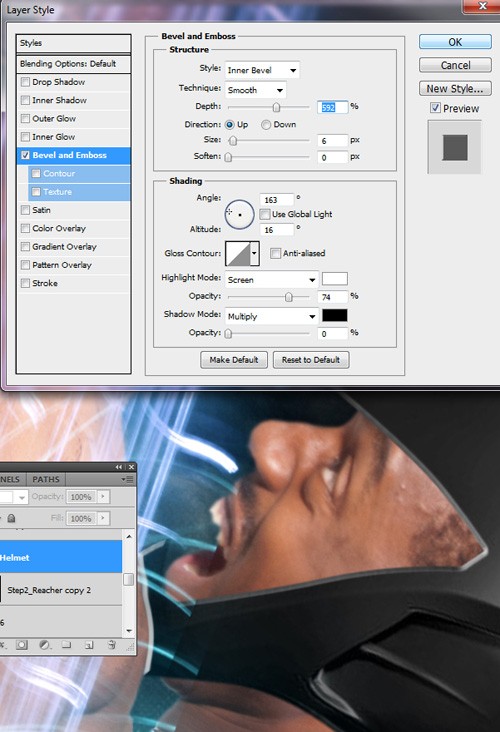
Create a new layer below the helmet layer. Using a black brush with 0% Hardness, paint the helmet shadows. Use the techniques in previous steps to make light streaks on the helmet.

Step 15: Whitened Eyes
Next, we are going to be making the eyes of the subject white. Using the Clone Stamp Tool, sample parts of the white sclera (do this by holding Alt/Option and clicking on the target sampling area) and clone it over the pupil. This will require some trial and error, and patience.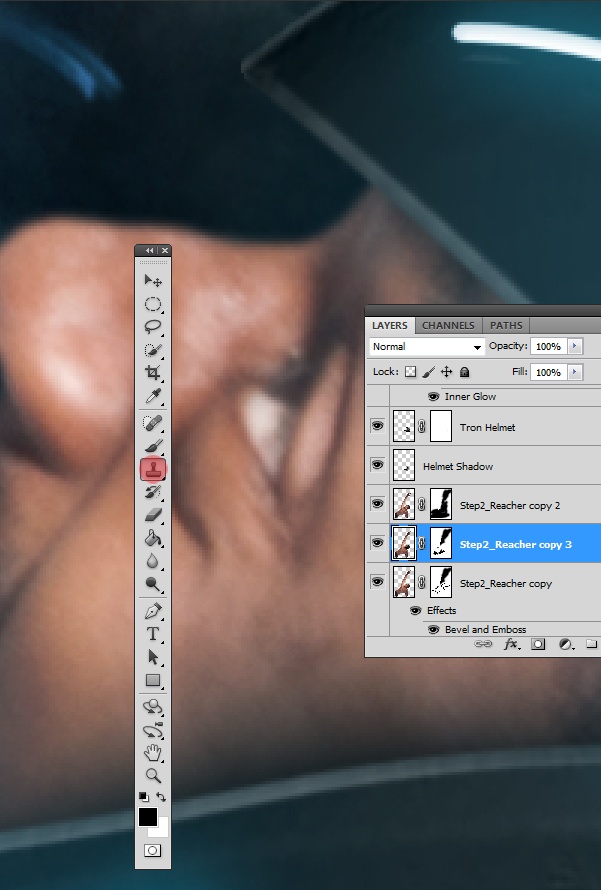
Step 16: Add More Light Streaks
Afterwards, make a new layer on top of the layer used to make the other streaks on the TRON lighting effects on the body. Use the same color as the streaks glow and use a brush with 0% Hardness to make a glow. Lower the Opacity to 37%.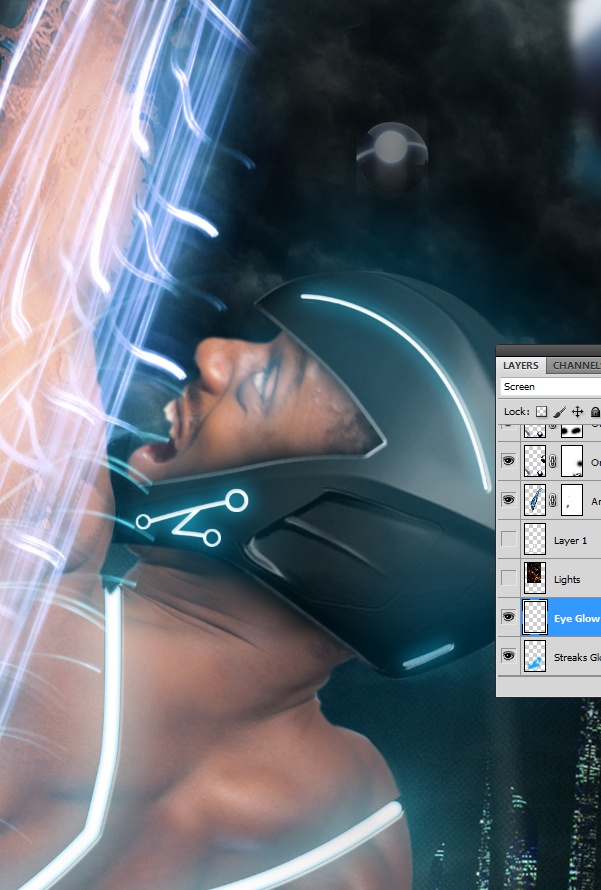
Step17: Atmospheric Effects
It’s time to add some atmosphere into the scene. Download and open Stock photo: smoke, place it onto our scene, and change the Blend Mode of its layer to Screen so that its black background disappears. Locate the smoke towards the bottom of the composition.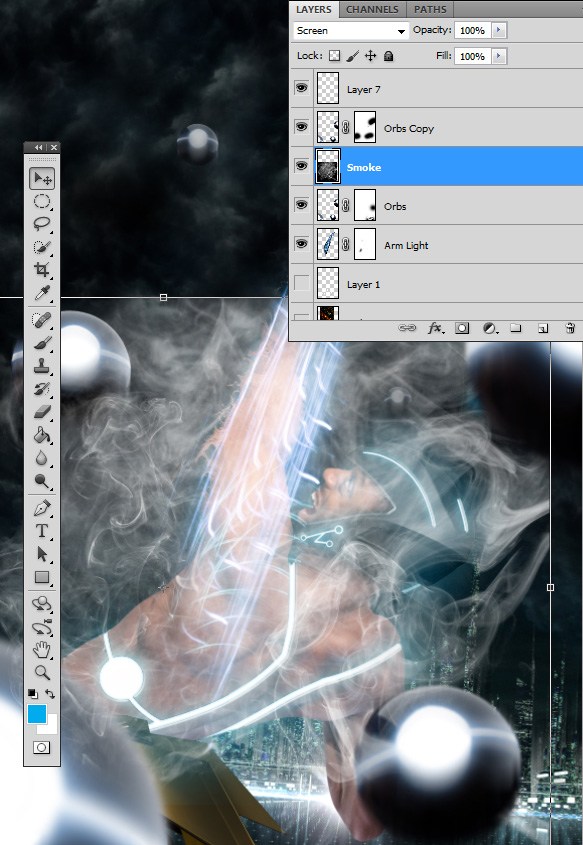
Use Curves image adjustment (Ctrl/Cmd + M) and Color Balance image adjustment (Ctrl/Cmd + B) to tweak the colors of the smoke.
Add a layer mask to the smoke layer and mask away some of the smoke in places where it may be too concentrated or where it might be covering the subject.
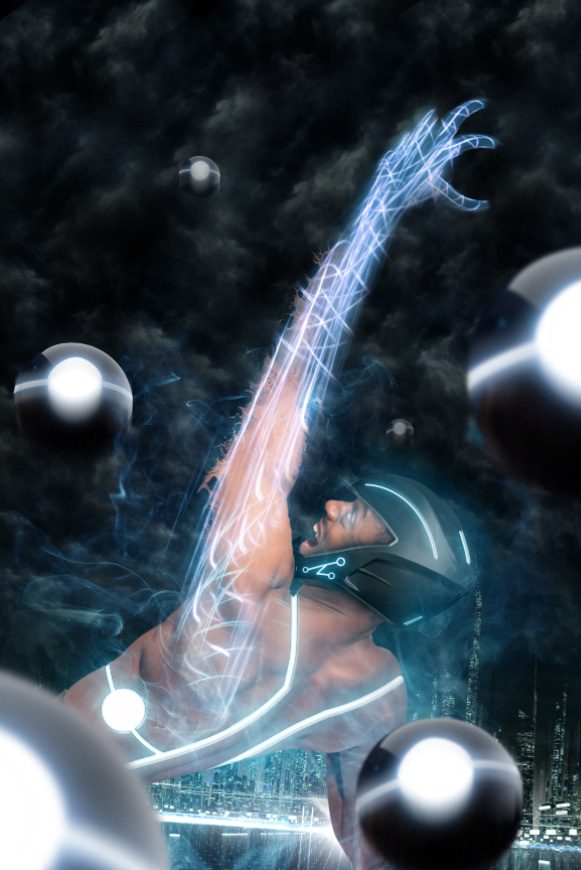
Step 18: Retouching the Arm
Now we are going to add the finishing touches to the arm. Mask away areas that you may think are excessive to really sculpt the arm.Copy the “Arm Light” layer and mask away the layer until you’re left with small light streaks. Use these smaller light streaks to augment the arm. Merge the layers afterwards (Ctrl/Cmd + E).
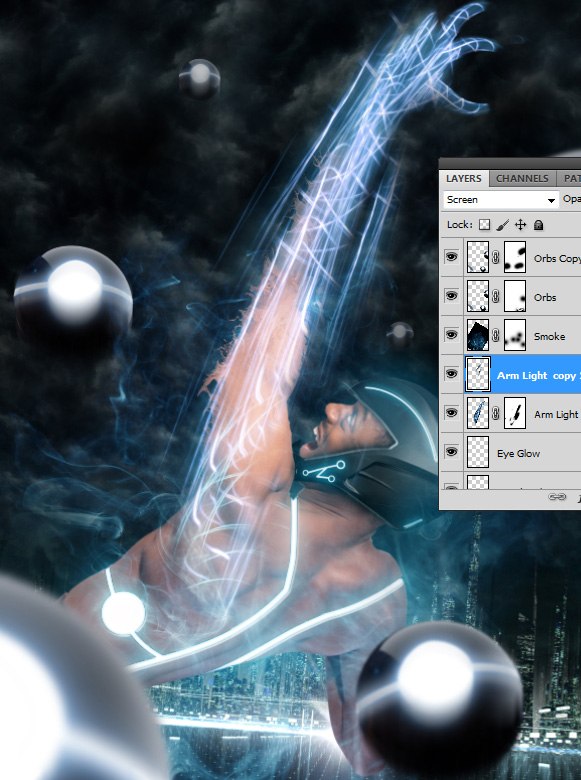
Download and install the 41 Grunge Brushes – PS7 brush library. Create a new layer and using one of the grunge brushes, brush large strokes over the arm.
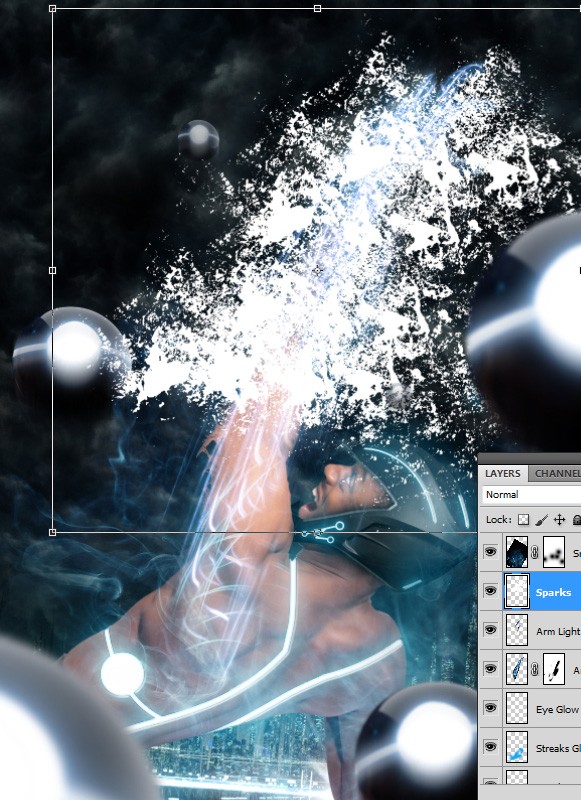
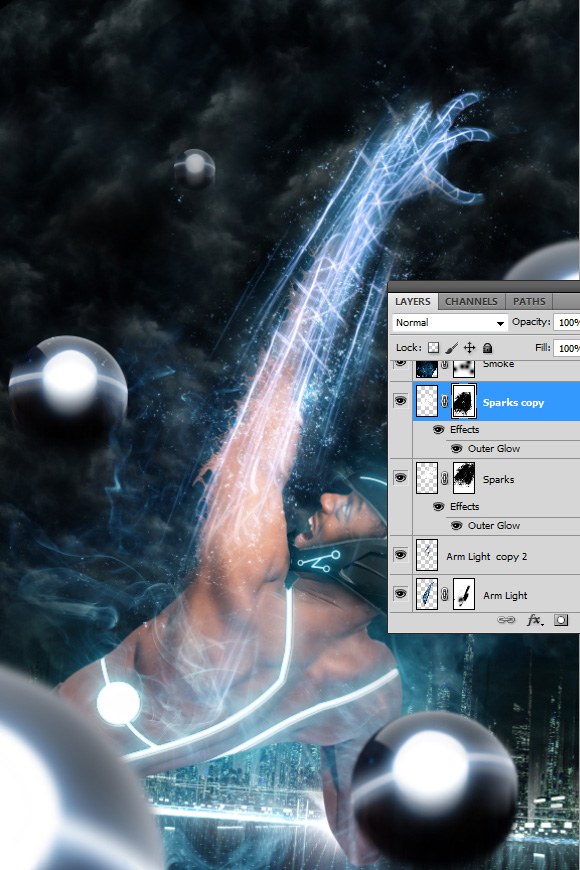
Create a layer mask on the grunge brush layer and, using the same or a similar grunge brush, mask the brush strokes until you’re left with just the fine particles. Give the layer an Outer Glow layer effect with a blue color (#8accef).
Step 19: Finishing Detail – Lighting Enhancements
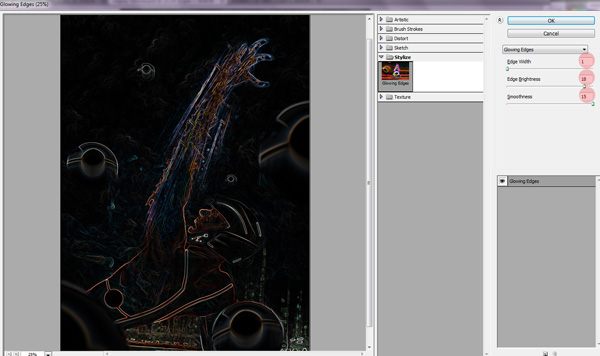
Now that we’re finished with all the elements of the composition, it’s time to really make the image pop; let’s start with the lighting.Create a new layer on top of all the layers and use the Apply Image command (Image > Apply Image.) Duplicate this layer. To the original layer, use the Glowing Edges filter (Filter > Stylize > Glowing Edges), change the Blend Mode of the layer to Screen, and then desaturate the layer (Image > Adjustment > Desaturate). What this does is it adds nice dynamic outlines.
For the duplicated layer, use a High Pass filter (Filter > Other > High Pass), then change the Blend Mode of the layer to Overlay.
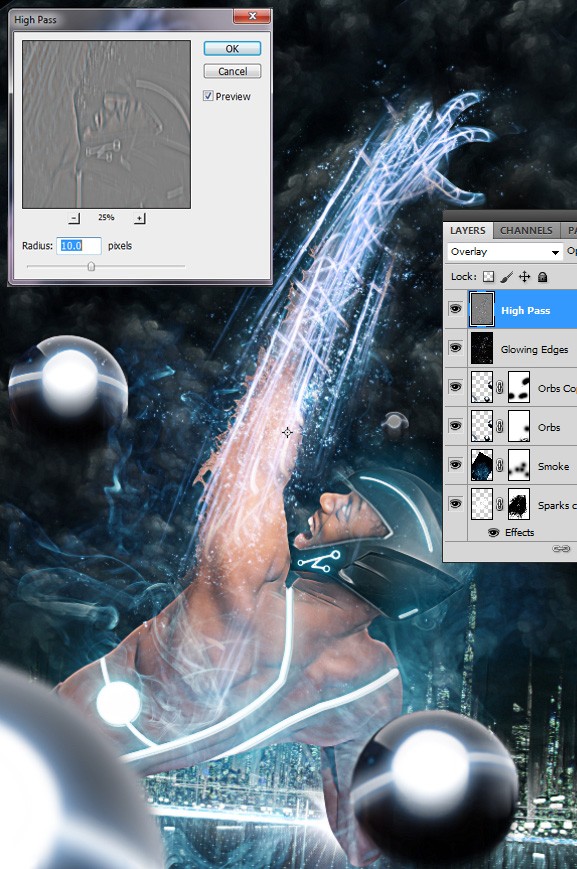
Add a layer mask to the glowing edges and mask away the sky, face and other parts of the body. Focus on only keeping the outlines and contours. Also reduce the opacity on both layers to a satisfactory level.
Step 20: Finishing Detail – Contrast
Now we are going to add some color contrast to the piece. The concept behind the following technique is that we are going to make one adjustment layer that brightens the image and one that darkens the image. Then we are going to paint the layer mask with black to hide the effects. Then, using a white brush, we are going to then reveal the shadows and highlights in the places we want them.To start, make 2 Curves adjustment layers with the following settings. The one with the higher curve is for the highlights (left) and the adjustment layer with the lower curve is for shadows (right).
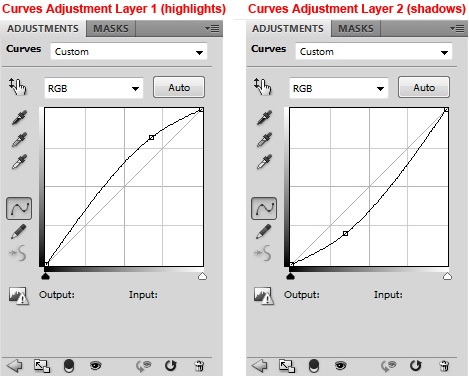
Give them a layer mask and then use the Paint Bucket Tool to paint the layer masks with black.
We will start with the shadow curves. With the layer mask selected, start brushing over the shadows using a white brush with 0% Hardness and low opacity. Change the size of the brush depending on whether you’re painting large or small areas. Change the opacity of the brush for lighter and darker shadows.

For the highlights, do the same thing. Use a white brush on the black layer mask to reveal which areas you want highlights on.
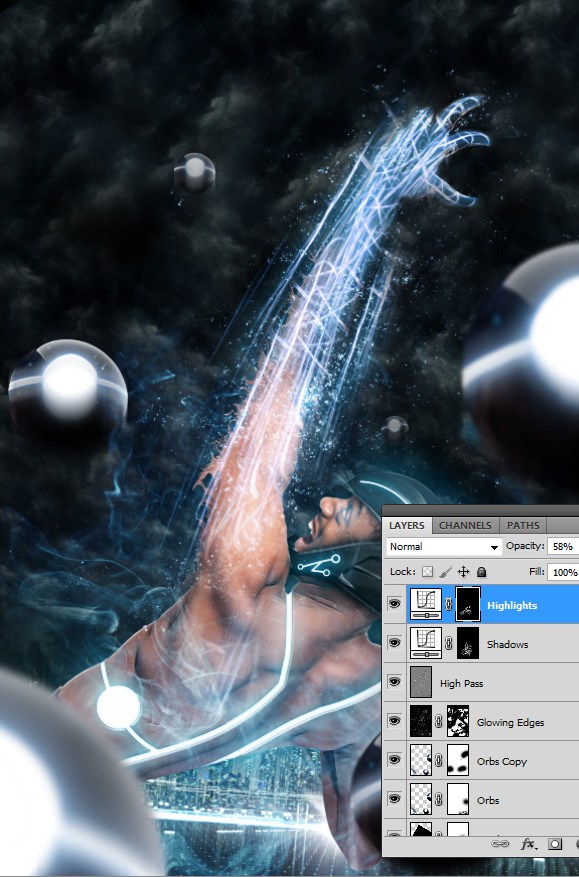
Step 21: Finishing Detail – Additional Contrast and Color Tweaking
Add a Gradient Map adjustment layer that goes from black (#000000) to blue (#01abee). Set the Blend Mode of the Gradient Map adjustment layer to Overlay and lower the layer’s Opacity to 17%.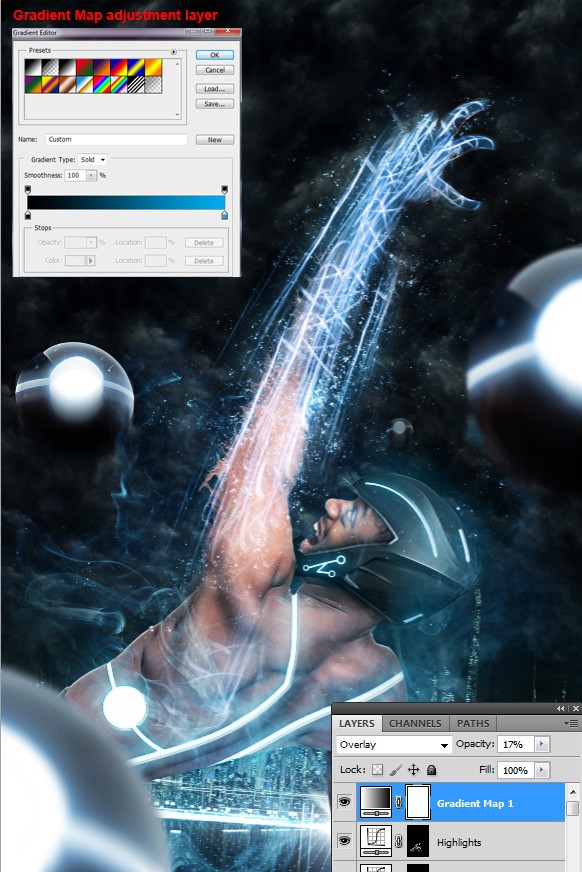
Step 22: Finishing Detail – More Movement
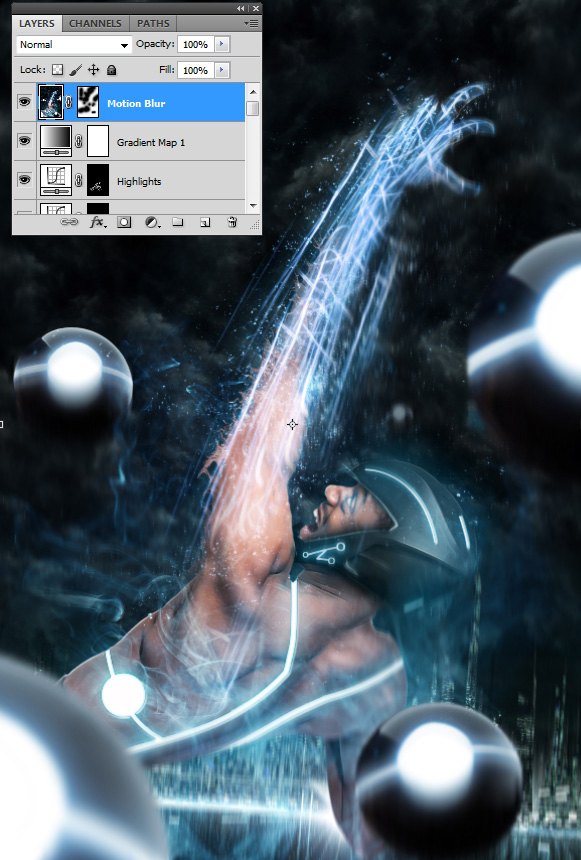
In our final step, we are going to give the image more movement by adding a motion blur. Make a new layer above all other layers and go to Image > Apply Image. Add a Motion Blur filter (Filter > Blur > Motion Blur) with Angle at -90o and Distance of 25px.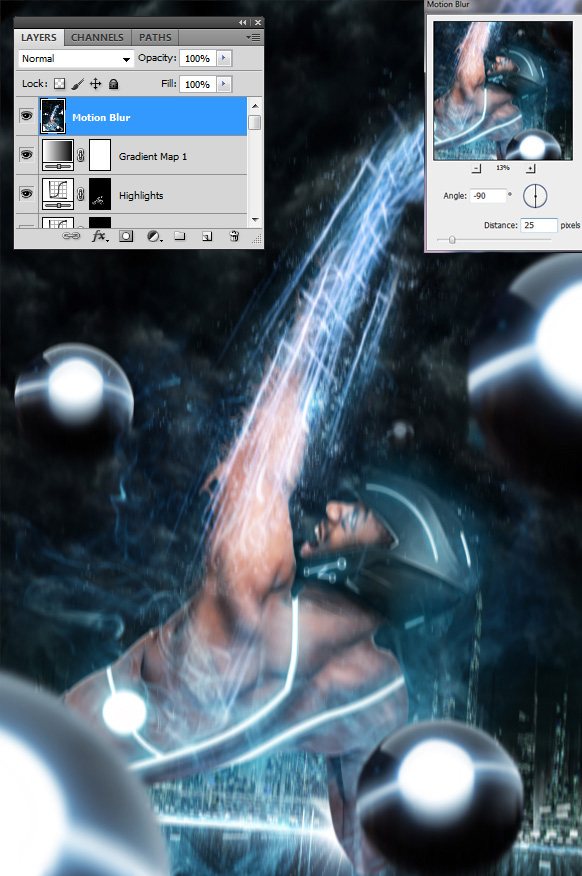
Add a layer mask and mask the motion blur on the front of most of the elements and parts of the background.
Tutorial Summary
We did a lot in this tutorial. Primarily, we combined various images to create a TRON-inspired composition. We added light streaks, used layer masks to our advantage, utilized a technique for color contrasting using Curves adjustment layers, and more.
No comments:
Post a Comment